

Table of Contents
Harley Davidson Brake Repair in West Palm Beach: Keeping Your Ride Safe
Your Harley’s brakes are the only thing standing between you and the road ahead–especially on the busy streets of West Palm Beach. Making sure they’re in top shape isn’t just smart; it’s survival. Between the relentless humidity, the blazing heat, and the stop-and-go traffic, brake systems take a beating here. That’s why regular Harley Davidson brake repair in West Palm Beach isn’t a luxury; it’s essential maintenance for every rider who calls this coastal paradise home.
We’re Manic Cycle–your neighbor and the Motorcycle Mechanic West Palm Beach FL riders count on for brake work. As fellow riders, we treat every Harley Davidson brake fluid flush and Harley Davidson brake pad replacement with the care of a master craftsman. Our shop is staffed by Harley Davidson PHD certified master technicians who bring genuine passion to every brake job. After all, safe rides are thrilling rides, and we view each visit as part of crafting your adrenaline-fueled dream into reality.
If you’ve been putting off a brake system check, now is the time to swing by our shop. Throughout this guide, we’ll walk you through the telltale signs of brake trouble, explain the crucial difference between a pad replacement and a fluid flush, and outline exactly what to expect from a professional brake service for your Harley.
But first, let’s look at the unmistakable signs that your brakes are begging for attention.
Brake System Basics and Safety Gear
Welcome to the heart of motorcycle craftsmanship–before you dive into a Harley Davidson Brake Repair in West Palm Beach, you need to understand the system you’re working on and gather the right gear. At Manic Cycle, we believe a confident rider starts with a confident wrench, so let’s get you prepped.
Understanding Harley Davidson Brake Systems
Your Harley features either a traditional hydraulic brake system or an Anti-lock Braking System (ABS). Traditional systems push fluid directly from the master cylinder to the calipers, while ABS adds a modulator unit that prevents wheel lock-up during hard stops. This means when you’re performing an ABS brake fluid flush, a scan tool is required to cycle the modulator, a critical step for complete fluid replacement. Both systems demand meticulous care of the calipers, rotors, pads, and lines to ensure safe, reliable stopping.
Essential Tools and Safety Precautions
Gathering the right tools before you start is non-negotiable. We always ensure our garage is prepared with these staples:
- A brake bleeder kit (a vacuum or pressure bleeder is ideal)
- A torque wrench with metric sockets
- A set of Allen keys
- Fresh DOT 4 or DOT 5 brake fluid (confirm your model’s spec)
- Your official service manual
Safety is just as vital as the tools. Before turning a single bolt, follow these precautions:
- Secure your bike on a stable lift or jack stands on a level surface.
- Put on nitrile gloves and safety glasses–brake fluid is corrosive.
- Always work in a well-ventilated area to avoid fume buildup.
- Never reuse old brake fluid; it is hygroscopic and absorbs moisture that can corrode your system internally, which is why we recommend a flush every two years.
- Dispose of old fluid properly at a recycling center.
If you hear squealing, feel reduced power, or detect a metallic grinding sound, it’s time for a Harley Davidson brake pad replacement. With your tools ready and safety checks complete, let’s move to the actual brake repair process.
When you need Harley Davidson brake repair in West Palm Beach, knowing how to inspect your own pads and fluid gives you confidence before calling the shop. We encourage every rider to check their brakes every 2,500 miles or before a long ride–here’s how to start.
Pad Inspection
Shine a flashlight at the caliper and find the wear indicator groove–a small notch in the friction material. If that groove is flush with the pad surface, Harley Davidson brake pad replacement is due. Also compare inner and outer pads: uneven wear often points to a caliper sticking, something our master–certified technicians catch early.
Fluid Check
Look at the transparent reservoir window. Fluid should sit between the MIN and MAX lines. Clean fluid appears light amber; dark, cloudy, or syrupy fluid means it’s time for a Harley Davidson brake fluid flush. Don’t top off dirty fluid–it hides contamination and delays a needed flush.
Quick Tools
Flashlight, clean rag, and your owner’s manual.
If your pads or fluid fail this visual test, the next section covers what your brakes might be telling you through feel and sound.
How to Perform a Brake Fluid Flush
For many real riders, learning the steps of a Harley Davidson brake fluid flush is the first step toward confident at-home maintenance. However, for those seeking top-tier quality work for their Harley Davidson brake repair in West Palm Beach, this guide will walk you through what goes into a thorough service.
A proper fluid flush helps remove moisture and contaminants that degrade your brake feel over time. It’s also a perfect opportunity to inspect your pads and see if you’ll need a Harley Davidson brake pad replacement soon. Stay safe by checking your owner’s manual for specifics, and always use the correct DOT 4 fluid unless Harley specifies otherwise.
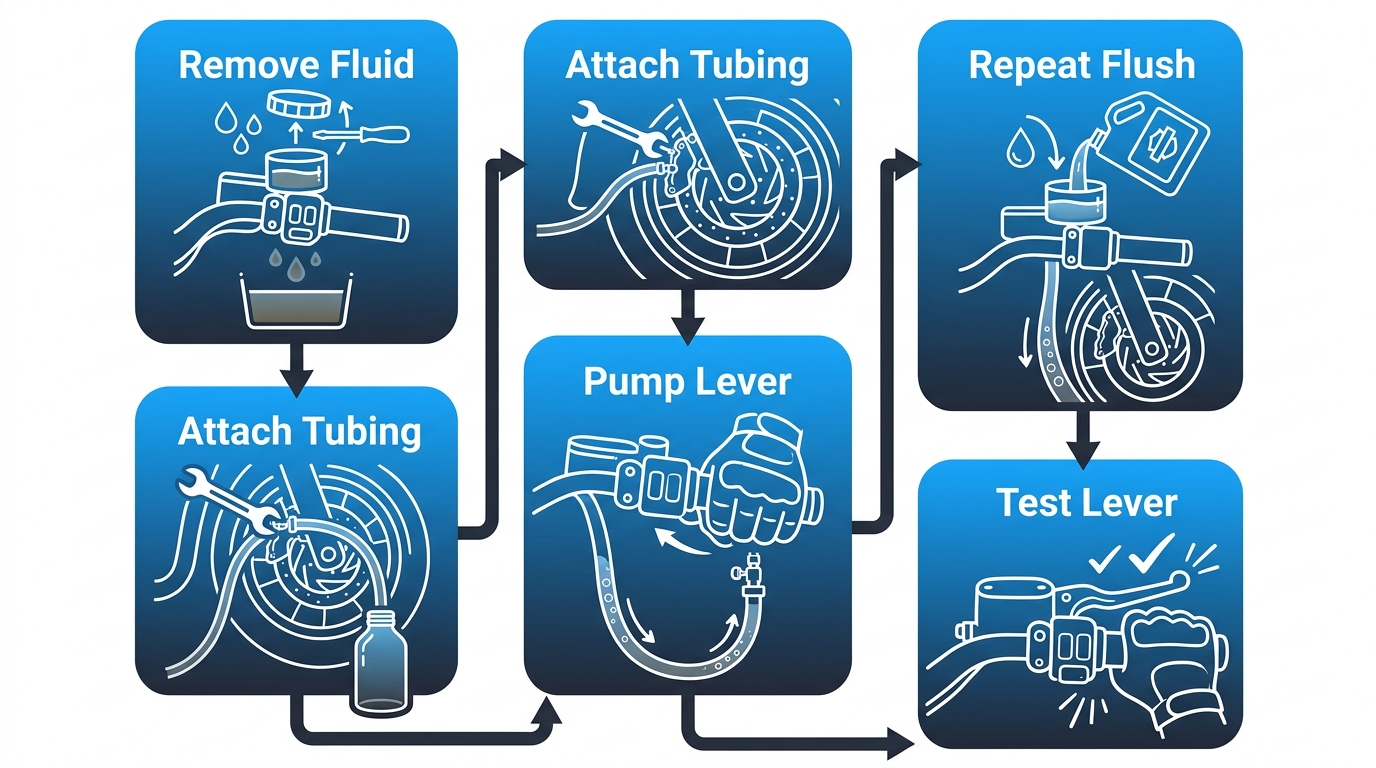
Complete Harley Davidson brake fluid flush process in five stages
Gather your tools first. Grab a turkey baster or syringe, a length of clear tubing, an empty bleeder bottle, and the box-end wrench that fits your bleeder valve. Now, open the master cylinder and gently suction the old, dark fluid from the reservoir without letting it run completely dry.
Next, attach your clear tube to the caliper bleeder valve and submerge the other end in fresh fluid inside your bleeder bottle. With the lever pulled and held, crack the valve open and watch the old fluid stream out. Close the valve before releasing the lever. Repeat this process, checking the master cylinder level every two to three cycles to prevent air from entering the system.
Once the fluid streaming through the line looks clean and free of bubbles, torque the bleeder valve shut and top off your reservoir. Before you head out, pump the lever until it feels firm–if it’s spongy, air is still trapped, and you’ll need to bleed again. If the process ever feels overwhelming, we’ve got you covered. For riders in West Palm Beach, we offer professional brake fluid flushes at Manic Cycle, where mastering your Harley’s braking performance is what we love to do.
Replacing Harley Davidson Brake Pads
Once you’ve gathered your tools and have a clean workspace, follow these steps for a smooth brake pad swap. For most Harley owners, tackling your own Harley Davidson brake pad replacement is a manageable DIY task, but knowing when to call a pro is key. If you’re searching for Harley Davidson Brake Repair West Palm Beach, this guide gives you the basics to decide whether to wrench it yourself or bring the bike into our shop.
Gather a socket set, Torx bits, a C-clamp, and a torque wrench. Safely lift the bike on a level surface, then unbolt the caliper without straining the brake line. Carefully compress the pistons while watching the reservoir, slide out the worn pads, and clean the caliper and rotor with brake cleaner. Position the new pads, reinstall the caliper, and tighten every bolt to factory spec.
Pump the lever to seat the pads, then bed them in with gentle stops from moderate speed. Check the fluid level–if it looks dark, consider a Harley Davidson brake fluid flush during your next service. With your new pads installed and bedded in, your braking system is ready for the road. If any step feels uncertain, our master technicians are here to help.
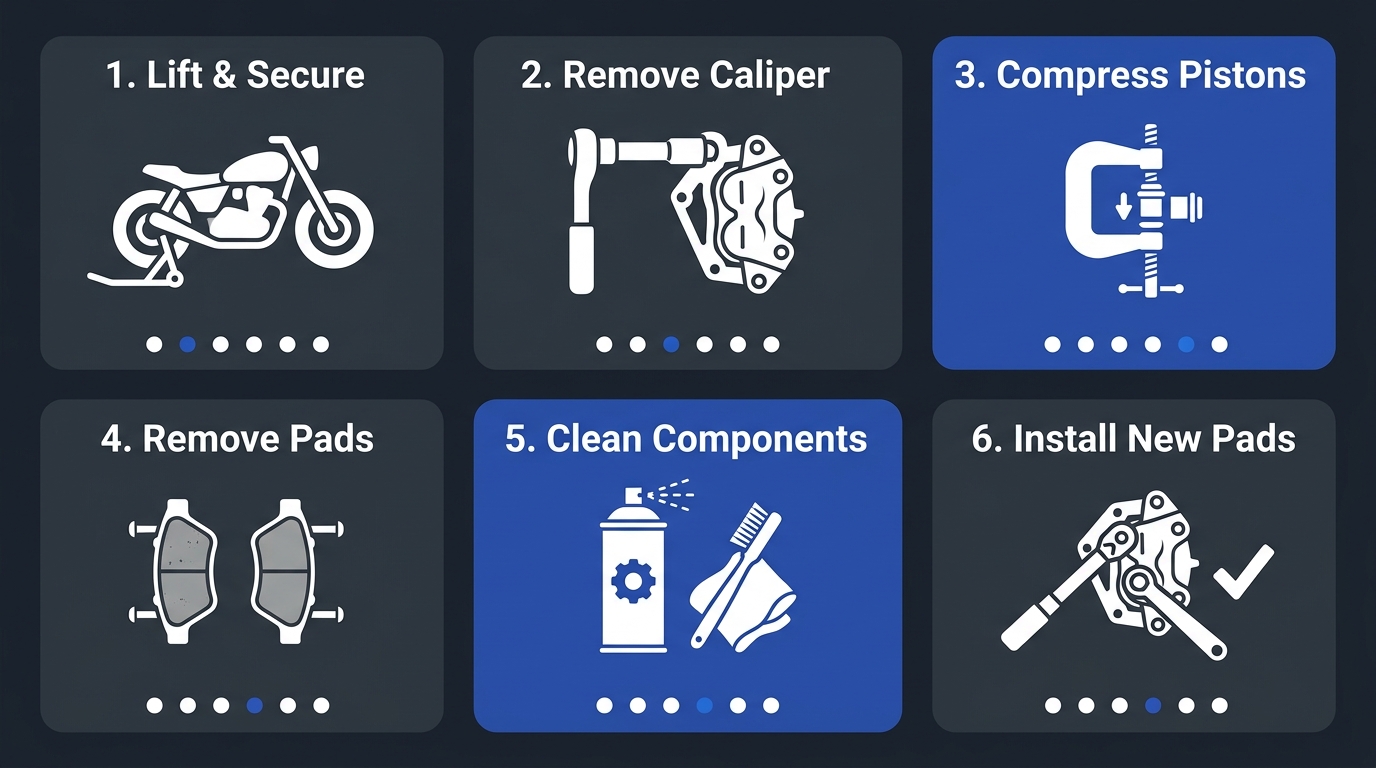
Harley Davidson brake pad replacement process flow diagram
Bleeding Air from the Brake Lines
Bleeding air from the brake lines is a critical part of a Harley Davidson brake fluid flush, and it’s a step that restores the firm, responsive lever feel we all rely on. Now that the brake system is open and fresh fluid is in the reservoir, it’s time to bleed any air from the lines. If you’ve just completed a Harley Davidson brake pad replacement, you’ll need to bleed the lines to remove any trapped air and ensure consistent stopping power. With our master craftsmen at Manic Cycle, we know that bleeding brakes is crucial to achieving power you can control.
Before you begin, gather a brake bleeder wrench, a clear vinyl hose, a catch bottle, and fresh DOT 4 or DOT 5 fluid as specified for your model. Always start at the caliper farthest from the master cylinder. Never let the reservoir run dry, or air will re-enter the system.
For the two-person method, one rider pumps the lever and holds firm pressure, while the second opens the bleeder valve to release old fluid and bubbles, then closes it before the lever is released. Repeat this pump, hold, open, close, release sequence until the fluid runs clear and bubble-free. A one-person vacuum method works similarly by attaching a pump to the bleeder valve. Once the brake lever feels firm and no more bubbles appear, you’re ready to reassemble the caliper and test the brakes. If your model has ABS, a special scan tool is often needed to cycle the pump; for riders in West Palm Beach, Manic Cycle offers complete Harley Davidson brake repair, including professional bleeding by our certified technicians.
(c) 2024 Manic Cycle – All rights reserved
Upgrading to Performance Brake Components
After mastering standard brake pad installation, many riders ask us about taking things further. When considering Harley Davidson brake repair in West Palm Beach, upgrading to performance components transforms your braking experience. A routine Harley Davidson brake fluid flush and Harley Davidson brake pad replacement create the ideal foundation for enhanced parts.
Sintered brake pads deliver sharper bite and resist fade during aggressive riding, while stainless steel braided lines provide firmer lever feel and consistent pressure at the caliper. Waved or drilled rotors improve heat dissipation and reduce unsprung weight, giving your bike the stopping power it deserves. We see these upgrades as an extension of essential maintenance, building on fresh fluid and properly bedded pads. Turning heads with every twist of the throttle demands control you can rely on.
Once your performance components are installed, proper bleeding and testing become critical. Trust our master-certified technicians to ensure every part works in harmony for safety and peak performance on the road.
Troubleshooting Common Brake Problems
Even with diligent maintenance, brake issues can surface on any Harley, and knowing how to diagnose them is a critical skill for real riders. A solid foundation for Harley Davidson brake repair in West Palm Beach comes from understanding the symptoms your bike is giving you and quickly determining whether a simple fix will do the job or if it’s time to call in our master craftsmen.
Spongy Brake Lever
A lever that feels soft or travels too far before engaging usually indicates air in the brake lines, and the primary fix is to bleed the system. For a comprehensive solution, we recommend a full Harley Davidson brake fluid flush with DOT-approved fluid to restore maximum hydraulic pressure. A leaking caliper or master cylinder can also cause a spongy feel, so a careful inspection is a must–after all, the firm, responsive power you can control is what keeps every ride safe.
Squealing or Grinding Noises
Squealing noise typically points to glazed pads or contamination on the rotor surface, whereas grinding almost always means the pads have worn down to the metal backing plate. Start by cleaning the rotor and pads. As a rule of thumb, if the noise persists after a thorough cleaning, it’s time for a Harley Davidson brake pad replacement performed with top-tier quality work to protect your rotors and ensure consistent stopping performance.
When to Call Manic Cycle
Some symptoms go beyond what a garage fix can resolve. If you see a persistent brake warning light, feel a pulsating lever or pedal signaling a warped rotor, or lose pressure after a full bleed sequence, the bike needs a professional touch. ABS diagnostics demand specialized scanning tools that only a certified tech can operate, and that’s exactly why we staff our bays with master craftsmen who bring proven, award-winning caliber expertise to every system they touch. While your Harley is in the shop for brakes, you can also unlock even more performance–check out our Harley Davidson Exhaust Upgrade West Palm Beach service and start turning heads with every twist of the throttle.
Solving braking problems promptly isn’t just about safety; it’s about preserving that edge of performance that makes every ride unforgettable. By trusting the right fixes to experienced hands, you’re taking rides to a newer level, crafting adrenaline-fueled dreams into reality one repair at a time.
Your Go-To Brake Care Guide for West Palm Beach Rides
West Palm Beach’s relentless heat and stop-and-go traffic demand serious attention to Harley Davidson Brake Repair West Palm Beach. We know that ignoring the early signs can turn a simple fix into a major safety issue. Your brake fluid absorbs moisture over time, silently leading to internal corrosion and dangerous brake fade.
That’s why a routine Harley Davidson brake fluid flush is essential to keep your ride responsive, and a timely Harley Davidson Brake Repair West Palm Beach pad replacement ensures you stop safely when it matters most. If you hear squeaking, grinding, or feel a soft lever, it’s your bike asking for our expert team.
We’re conveniently located on North Australian Avenue and dedicated entirely to the Harley community. We invite you to visit Manic Cycle for the precise Harley Davidson brake pad replacement care your bike deserves, trusting our master technicians to keep you in power you can control. After all, our mission is always about real riders taking rides to a newer level while keeping your machine in peak, road-ready condition.
This article was researched and written with the assistance of AI tools.